Mastering Linux File Permissions and Access Control Lists

Welcome to the world of Ubuntu Linux! 🐧 In this blog, we will embark on an exciting journey to explore File Permissions and Access Control Lists (ACLs). 🚀🔐
Let's get started.
Understanding Ubuntu Linux File Permissions 📁
Before we talk about ACLs, let's learn the basics of file permissions. In Ubuntu Linux, every file and folder has three main permission types:
Owner (user) 🧑💻: The person who created the file or directory.
Group 👥: A set of users who share specific permissions.
Others 👤: Everyone else on the system.
Each category can have three types of permissions:
Read (r) 👀:
Allows users to view the content of a file or list the contents of a directory.
Write (w) ✍️:
- Permits users to modify the content of a file or create/delete files within a directory.
Execute (x) 🏃♂️:
- Enables users to run a file as a program or access files within a directory.
Let's examine the types of permissions using a flow diagram and a detailed explanation.
Here is a table of what read, write and execute permissions mean for files.
Permission | Description |
r read | The user, group or others can read the file, with a command such as cat, or vi (in read-only mode) |
w write | The user, group or others can modify and save the file with commands such as nano or vim |
x execute | The user, group or others can execute the file. This is most of the time used for scripts. |
Here is a table of what read, write and execute permissions mean for files.
Permission | Description |
r read | The user, group or others can list the content of the directory (using a ls command for example) |
w write | The user, group or others can add or delete files from the directory |
x execute | The user, group or others can go through the directory for navigation. |
Let's now proceed with a practical demonstration.
Make a basic file (devops.txt) and use ls -ltr to view file details. Remember, the three permissions are for three user groups:
Step 1: Open a Terminal
- SSh your Ubuntu VM or Instance.
Step 2: Create a Simple File
Go to the directory you want, and make devops.txt
Created devops.txt file
hemant@LintuxVM01:/home$ cd hemant
hemant@LintuxVM01:~$ ls
hemant@LintuxVM01:~$ touch devops.txt
Step 3: Check File Details with
Now, let's use the ls -ltr command to view the details of the file we just created.
hemant@LintuxVM01:~$ ls -ltr
total 0
-rw-rw-r-- 1 hemant hemant 0 Jul 22 05:33 devops.txt

Here's the breakdown of the output:
-rw-rw-r-- 1 hemant hemant 0 Jul 22 05:33 devops.txt
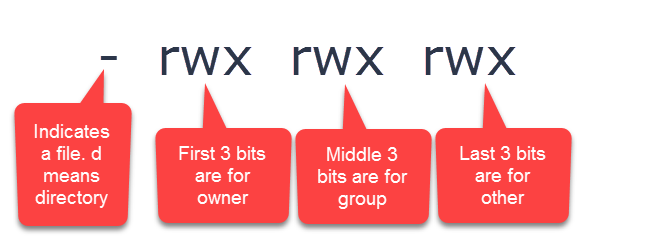
-rw-rw-r--: This part shows file permissions.The first character indicates the file type (
-for a regular file).The next nine characters are divided into three groups of three.
Each group represents the permissions for the owner, group, and others, respectively.
1: The number of hard links to the file.your_username: The owner of the file.your_groupname: The group associated with the file.0: The file size in bytes. (as no data in it)Jul 22 05:33: The date and time the file was last modified.devops.txt: The file name.
Each of the three permissions is assigned to three specific categories of users.
The categories are as follows:
The three categories of users are represented by the three sets of permissions in the file details:
Owner (user): The first three characters represent the permissions for the owner. In the above example, it is
-rw.- which means the owner has read and write permissions but no execute permission.
Group: The middle three characters represent the permissions for the group. In the above example, it is
-rw.- which means the group members have only read and write permission.
Others: The last three characters represent the permissions for others. In this example, it is
r--.- which means anyone else on the system also has read-only access to the file.
That's it! You have successfully created a simple file and checked its details using the ls -ltr command, understanding the three categories of users and their permissions. 🎉
Let's start trying out file permission commands.
Change User Permission
Change User Permission Observe the alterations after executing the 'ls -ltr' command.
Current Permissions
hemant@LintuxVM01:~$ ls
devops.txt
hemant@LintuxVM01:~$ ls -ltr
total 0
-rw-rw-r-- 1 hemant hemant 0 Jul 22 05:33 devops.txt
Change User Permissions
To change the permissions for the owner (user), we will use the
chmodcommand. Let's give the owner execution permission. This command adds execute permission (+x) for the user (owner) to the file "devops.txt."
hemant@LintuxVM01:~$ chmod u+x devops.txt
hemant@LintuxVM01:~$ ls -ltr
total 0
-rwxrw-r-- 1 hemant hemant 0 Jul 22 05:33 devops.txt

Verify the Permission Change
After changing the permissions, let's check the file details again using the
ls -ltrcommand. The output will now reflect the updated permissions.
hemant@LintuxVM01:~$ ls -ltr
total 0
-rwxrw-r-- 1 hemant hemant 0 Jul 22 05:33 devops.txt

as per the above-shown notice that the permissions for the owner (user) have changed from rw- to rwx, indicating that the owner now has read, write, and execute permissions.
Change Group Permission
Change Group Permission Observe the alterations after executing the 'ls -ltr' command.
Current Permissions
As per the below result, you see the group doesn't have to execute permission.
hemant@LintuxVM01:~$ ls -ltr
total 0
-rwxrw-r-- 1 hemant hemant 0 Jul 22 05:33 devops.txt
hemant@LintuxVM01:~$
Change Group Permissions
To change the permissions for the Group, will use the
chmodcommand. Let's give the owner execution permission. This command adds execute permission (+x) for the user (group) to the file "devops.txt."
hemant@LintuxVM01:~$ chmod 774 devops.txt
Verify the Permission Change
After changing the permissions, let's check the file details again using the
ls -ltrcommand. The output will now reflect the updated permissions.
hemant@LintuxVM01:~$ ls -ltr
total 0
-rwxrwxr-- 1 hemant hemant 0 Jul 22 05:33 devops.txt

as per the above-shown notice that the permissions for the group have changed from rw- to rwx, indicating that the group now has read, write, and execute permissions.
Change other Permission
Change Other Permission Observe the alterations after executing the 'ls -ltr' command.
Current Permissions
As per the below result, you see the other doesn't have to execute permission.
hemant@LintuxVM01:~$ ls -ltr
total 0
-rwxrwxr-- 1 hemant hemant 0 Jul 22 05:33 devops.txt
Change Other Permissions
To change the permissions for the Other, will use the
chmodcommand. Let's give the other execution permission. This command adds execute permission (+x) for the other to the file "devops.txt."
hemant@LintuxVM01:~$ chmod 775 devops.txt
Verify the Permission Change
The output will now show the updated permissions.
hemant@LintuxVM01:~$ chmod 775 devops.txt
hemant@LintuxVM01:~$ ls -ltr
total 0
-rwxrwxr-x 1 hemant hemant 0 Jul 22 05:33 devops.txt

Congratulations! 🎉 You have successfully set different user/group and other permissions on the file "devops.txt" in Ubuntu Linux.
This allows the owner, group, and others to have specific access rights to the file, enhancing security and control over file access.
Let's start ACL (Access Control List)
🔐 ACLs take file permissions to the next level by providing more flexible permission control. With ACLs, we can assign specific permissions to individual users and groups beyond the traditional owner, group, and others.
ACLs in Ubuntu
First Enabling ACLs in the Filesystem
💡 It may be necessary to install acl utilities from the repositories. In the Server Edition, this must be done, but in the desktop editions acl is installed by default.
💡To start using ACLs, we need to ensure our file system supports them. Most modern Linux distributions, including Ubuntu, have ACL support enabled by default.
$ sudo apt-get install acl

ACL Entries
ACL entries consist of a user (u), group (g), other (o) and an effective rights mask (m). An effective rights mask defines the most restrictive level of permissions.
"setfacl" sets the permissions for a given file or directory.
"getfacl" shows the permissions for a given file or directory.
Let's fire "getfcal" command on our devops.txt file
The ACL settings can be listed by the command getfacl . If no ACL were set explicitly, getfacl shows the standard file permissions with much better readability than the standard ls -l command as below shown in command output and snapshot.
hemant@LintuxVM01:~$ getfacl devops.txt
# file: devops.txt
# owner: hemant
# group: hemant
user::rwx
group::rwx
other::r-x

Set ACL with "setfacl"
Now, let's set the ACL for "devops.txt" using the setfacl command. We'll grant read and write permissions to the user "hemant".
hemant@LintuxVM01:~$ setfacl -m u:hemant:rw devops.txt
In this command:
-m: Indicates that we're modifying the ACL.
-m signifies the modification of permissions for the user specified by user_name
u:hemant:rw: Grants read (r) and write (w) permissions to the user "hemant."
Verify the ACL
To verify that the ACL has been set correctly, use the getfacl command again:
hemant@LintuxVM01:~$ getfacl devops.txt
# file: devops.txt
# owner: hemant
# group: hemant
user::rwx
user:hemant:rw-
group::rwx
mask::rwx
other::r-x

The ACL is now in place, and you've successfully granted specific permissions to the user "hemant".
- Now, if we look at the standard file permissions with
ls -llike at the beginning, notice the plus sign at the end of the file permissions block.
hemant@LintuxVM01:~$ ls -l
total 0
-rwxrwxr-x+ 1 hemant hemant 0 Jul 22 05:33 devops.txt
That indicates active ACL settings and warns to interpret file permissions differently than without ACL.
The mask rw is now printed at the place where normally standard group permissions are shown.
This is not to confuse with those permissions, which still allow read-only access for the members of the group hemant.
In our upcoming blogs, we shall dive into practical examples, showcasing how setfacl can empower you to become a security officer.
Embrace the journey, for the secrets of access control await! 🗝️🔒💫
The tool setfacl is quite powerful with many options, as explained in full here.
Conclusion 🎉
Best wishes! 🎊You now understand Ubuntu Linux File Permissions and Access Control Lists. 🛡️You can now confidently control permissions and secure 🔒 your data. Remember to exercise caution while altering permissions to avoid unexpected consequences.
Ubuntu Linux provides sophisticated tools for controlling access to files and folders, resulting in a strong security architecture for your system. Accept this knowledge and experience the huge possibilities that Ubuntu Linux has to offer! Happy computing! 🚀💻
Thank You !!


